Hemp Sites includes WP Fluent Forms to make effortless contact forms in minutes! To view all of the available documentation, click here. To read our quick start guide, continue reading below.
How To Create A Form #
Click on the New Form button on the left-hand menu under Fluent Forms.
You can also create a new form by clicking on the Add Form button from the All Forms dashboard.
Clicking on the New Form / Add a New Form button opens a pop-up that allows you to choose form type which is displayed as categorized. The three form types include regular forms, premium forms, and blank form.

Next, click on the top corner button shown in the below image “Contact Form Demo” to give your form a name.

Add fields according to your requirements by clicking on the input field buttons or just drag and drop them to the editor.

Customize the Fields as required. To customize, hover on it and click on the Edit icon. You can also click on the Input Customization tab on the right sidebar. These customizations offer you various options starting from renaming a field to define the maximum size of a file input field

Done with the customization and everything? Click on the Save Form button on the top-right corner of your screen.
To add your new form to your website with the Birthing Your Brand Page Builder, find the Advanced Form Widget and drag-and-drop it to your page. With this widget, you can style your form to match your website’s style.
How To Add Fields To Your Form #
Adding an input field is the common task of creating any kind of form. You can add any field types by two different methods:
- Click – Add your field with a single click by selecting the input field on the right side.
- Drag and Drop – Select the respective field on the right side menu and drag it to where you would like it on your form. Once it is where you would like it, release the left click button on your mouse to drop it.
Set Up Form Submission Confirmation Message #
When someone fills up a form on your website, you will need to show them a confirmation message to assure them of the form submission.
We have set a default confirmation message that says- “Thank you for your message. We will get in touch with you shortly.” But you can customize this message according to your requirements.
To set up a customized message, go to the Settings & Integrations menu at the top of the page.

Here you will find three different options to show when someone has submitted a form.
- Same Page – Same page is selected by default. It enables you to show the submission message on the same page the form is in. Edit your confirmation message in the Message to show field.
- To a Page – Enables you to redirect after a successful form submission to a different page on your website. Use the Select Page option to pick a page.
- To a Custom URL – Enables you to redirect your subscriber to a page/website that is not on your website. Put the URL you want to redirect to in the Custom URL field.

Setting Up Admin Email Notifications #
Receive an email notification every time someone completes your form.
To begin, go to the Settings & Integrations tab for your form. On the left-hand side, select the Emai Notifications option.
Click on Add Notification at the top right.
Name the email notification.
Select Enter email in the Send to field and define the email address you want your notifications delivered to.
You can customize the subject of the notification email under the Subject settings.
Configure the email boy the way you need it by using the Add Shortcodes dropdown at the right side. We recommend using {all data} to get all of the information that has been completed on the form.
Configure Payment Settings #
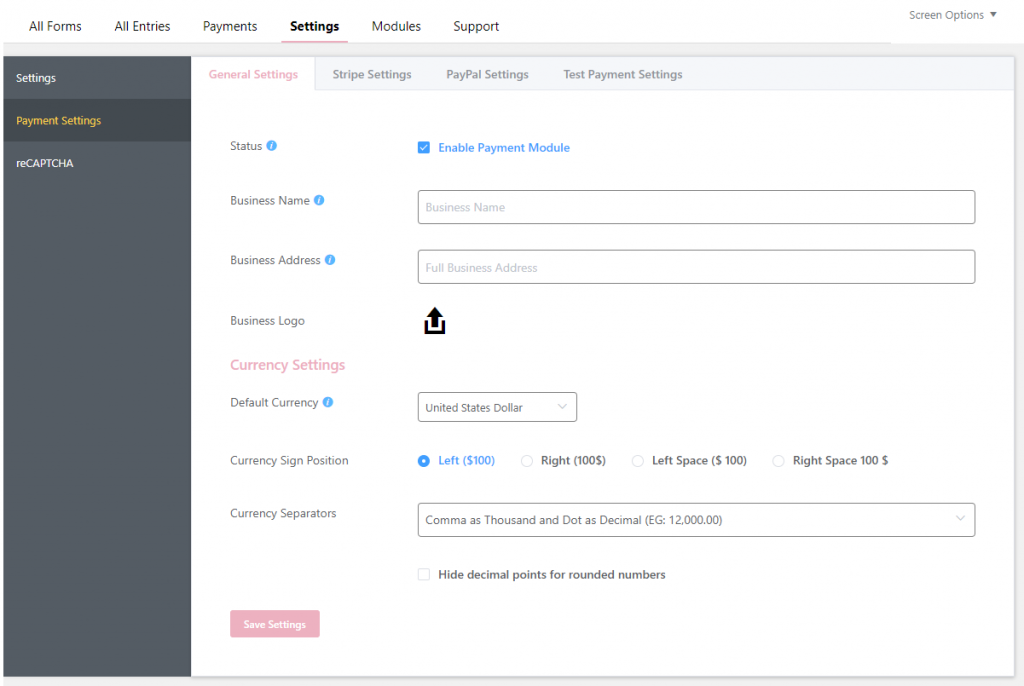
To configure payment settings, first, go to the global settings from your dashboard. Next from the left sidebar, select Payment Setting.

Check the Status box to Enable Payment Module. Now set your Business Name and Business Address. Then click on the arrow to upload your Business Logo.
Next comes the currency settings. Set your Default Currency using a dropdown menu.
Then choose Currency Sign Position using the radio buttons. Now use the dropdown menu to select your Currency Separators.
How To Integrate Stripe #
To integrate Stripe, you will need an API key. If you don’t already have a Stripe account, you should sign up for one now.
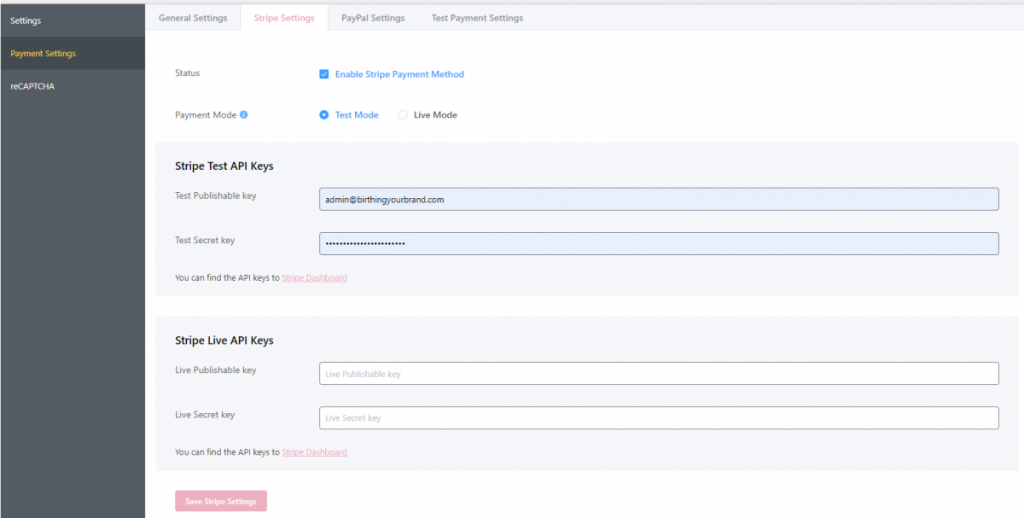
To set up Stripe, go to the global Settings from your dashboard and then choose Payment Settings from the left sidebar.
Go to Stripe Settings. You will have to check the Status to Enable Stripe Payment Method.

After enabling the Stripe Payment Method, some options will appear in front of you. You will be asked to choose a Payment Mode. There’s a Test Mode and a Live Mode. Let’s set up the Test Mode for Stripe. Be notified, the Live Mode can be enabled in the same way we are setting up the Test Mode. Next, you will need to provide some test API Keys first. Login to your Stripe account to obtain these keys. Click on Get your test API keys.
Once you click on the arrow, a set of keys will appear. There will be a Publishable key and a Secret key. Simply click to copy. Head back to the Advanced Contact Forms dashboard, and paste the keys in their respective fields. Once you provide the test API keys, you will be asked for live API keys. Head back to your Stripe account and copy the live API keys from there. Paste them in their respective fields. Then click on the Save Stripe Settings.
Now create your form and add a Payment Field. Set the Element Label, place your Label. Set the Admin Field Label and Product Display Table.
On the Payment Settings, put the price of each product.
Next add a Payment Method Field and set the Element Label. Choose your Payment Methods.
Save the form and preview before launching. And that’s it!
Please be notified, an error message will appear, if you haven’t configured your Stripe business account.
How To Integrate Paypal #
To set up PayPal integration, first, go to the global Settings from your dashboard. There’s a sidebar on the left. Choose Payment Settings.
Next, go to the PayPal Settings. Again, you will have to tick the Status box to Enable PayPal Payment Method.
Next, you will have to select a PayPal Payment Mode. There are two options. A Sandbox Mode and a Live Mode.
You will be asked for your PayPal Email. This is the email you used to register for a PayPal account. Put it in the field.
Now click on the Save PayPal Settings. Congrats, you have successfully integrated PayPal.
Accept Payments with Advanced Contact Forms
To begin, create a new form by selecting the Add New Form button. You can begin with a template or blank form.
Add payment fields to your form. The payment field is located on the right sidebar of the form consisting of four fields which are Payment Field, Custom Payment Amount, Item Quantity, and Payment Method Field.
Now add the Payment Item Field into the form. Give the field a name from Element Lebel on the right sidebar of the field, also give the item price from Payment Amount and add Amount Label.
Add Item Quantity Field into the form to allow the users to order as many as they want. The product field mapping will automatically select the product for which the quantity is used. If you have multiple products please map the quantity field with the respective product. You can also provide min and max value for the quantity.
Now add the final field into the form which is the Payment Method Field. You can enable PayPal, Stripe or both as the Payment Processor.
You can show the total amount or total payable amount using the shortcode {payment_total}. For example, in the button text if you add the shortcode it will show the total inside the button. You can use the HTML field also to show the total amount.


