Table Rate Shipping puts you in control of your shipping, set up rules and conditions to determine which price the customer is offered at checkout.
Settings Page #
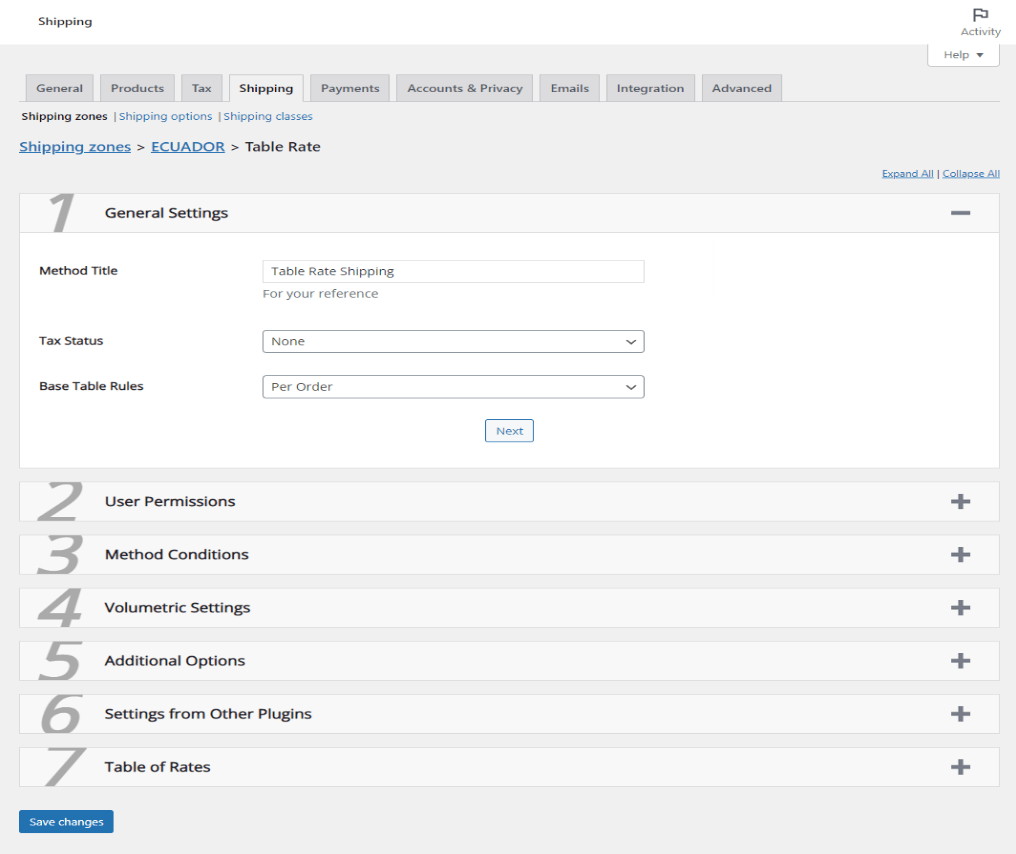
Table Rate Shipping is compatible with WooCommerce Shipping Zones. To get to the settings, from your dashboard go to WooCommerce –> Settings –> Shipping –> Shipping Zones. From there you will need to create the necessary shipping zones. For your shipping zones you will now be able to select the “Table Rate” option to add to your chosen zone.
The Table Rate settings page is comprised of 5 sections, each containing a set of options for configuring this method. Each section can be expanded or collapsed to hide what you do not need at the moment.

General Settings #
A small but very important section, these settings will determine how the final price is calculated.
Method Title – This field is purely for your own reference. In your shipping settings this method will be listed by its ‘Method Title’, however it does not appear on the frontend of your shop. Customers will not see this text as they will be shown the title you specify in the table of rates.
Tax Status – This select box lets WooCommerce know whether or not you would like to tax this shipping method. When set to Taxable, the shop will tax the method according to your already defined tax settings. When Disabled, you will be able to leave ‘Shipping’ enabled on the tax page, but WooCommerce will not tax any shipping costs coming from this method.
Base Table Rates – How the conditions and costs apply to the customer’s cart is determined by this option.
- Per Order bases the conditions on the entire order as a whole. For example, if you require a certain product category for one of your shipping options, it will only care the one or more items in the cart belong to that category. If you charge $5 shipping multiplied by quantity, then it will multiply the cost by the total number of items in the cart.
- Per Item will cycle through the customer’s cart line by line and find a shipping cost for each item separately. It will then combine the costs for each item in to one shipping option for the customer. For example, if one of your requirements is that price is greater than $10, the purchase price of the item would need to be more than $10.
- Per Line Item is very similar to the previous option ‘Per Item’, but it bases the conditions on the total amount purchased. For example, if one of your requirements is that price is greater than $10, then the customer would need to be purchasing at least $10 worth of the item.
- Per Class utilizes an optional shipping feature of WooCommerce. Shipping classes are like product categories, except they categorize the shipping properties of an item. If you opt to use shipping classes and the ‘Per Class’ option here, the plugin will group the cart items based on shipping class. It will then calculate a cost for each group and combine them into one option for the customer.
User Permissions #
Shipping options appear for – By default shipping options defined here will appear for everyone. If you would like to setup different rates for different user roles, this option will be able to help. After selecting the Specific Roles option, another option will appear: Ship to Roles. This will allow you to select one or more roles that can receive these shipping options.
Settings can be modified by – By default only admins and users with shop manager positions will be able to modify shipping. Sometime in the near future this will be expanded upon to include users, user roles, and more.
Method Conditions #
This section contains the ability to add conditions at the method level. It contains the exact same conditions as the Table of Rates, however they will be based on the order as a whole group regardless to what you chose for the Base Table Rules option above.
Conditions – The conditions listed here will determine whether or not shipping should be calculated. All of these conditions must be met (true). If one or more condition returns ‘false’, the method will cease to run. Shipping will not be calculated from this method and no options will be returned.
Volumetric Settings #
Also popularly known as ‘Dimensional Shipping’, volumetric shipping is a provider’s way of calculating weight values based on dimensions. If your prefered shipping carrier uses this type of calculationto adjust weight based rules, these settings will help make it easier to follow their lead.
Volumetric Number – Every provider using dimensional shipping will have a “magic number” they use to calculate the volumetric weight of an item. Entering that number here will enable this feature. When enabled, a volumetric weight will be calculated for each item in the cart. It is then compared to the physical weight of the product. The larger of the two numbers will become the product’s true weight.
Operand – There are two common equations for calculating volumetric weight. Each involves the volume of the item and volumetric number supplied above. One will divide the volume by the volumetric number, and the other will multiply it. This option will determine which the plugin uses.
Additional Options #
Include Tax – WooCommerce considers the subtotal to be the item price before any taxes or discounts are applied. Enabling this option will have the plugin compare prices including their tax value.
Include Coupons – As described above, WooCommerce considers the subtotal to be the item price before any taxes or discounts are applied. Enabling this option will have the plugin compare prices including their discounted value after coupons. If calculating per item or per class, and a cart based coupon is applied such as a $10 discount, the price for each item will include a prorated amount of the discount given.
Single Class Only – Only available when the Condition field is set to ‘Per Class’, this option allows you to only return the cost of one shipping class, instead of all of them combined. All items in the cart will still need to qualify for shipping in the same option, but only one price will be shown to the customer. There are two options: highest priority and highest cost. Setting up class priorities will be discussed later in the documentation.
Round Weight – This option, when enabled, will round up the weight values to the next whole number.
Hide This Method – If you choose to use the WooCommerce Free Shipping method to offer your customers the choice of free shipping, this option offers the ability to remove all rates calculated when the ‘Free Shipping’ method has also returned a shipping rate.
Table of Rates #
The table of rates has been condensed to three columns, with additional options in a box to the right. When you first setup this shipping method, it will ask you how many options you wish to give your customers. After selecting a number, a separate section will appear for each option with the headline “Shipping Option #” followed by the shipping option’s ID number.
Below you will find the Shipping Option Title field. This is the text that the customer will see next to their shipping cost during checkout. It is a required field in order for the rest of your settings to save.
The table below the option title field is where your shipping costs will be configured. Each table can have a unlimited number of rows, but you only need one row for each different price point or criteria that must be met. The rows must also be placed in order by their priority. When calculating shipping, the plugin will start at the top of the list and provide the shipping cost of the last qualifying row. To add a new row to the table, click the ‘Add Shipping Cost’ link to the left, beneath the table. If you wish to delete rows that you have already setup, mark the checkbox in the left most column of the rows you wish to remove. Click the ‘Delete Selected Costs’ link also on the left beneath the table to remove them from the table. After any rows are added or removed, you will need to click the ‘Save Changes’ button at the bottom of the page in order for these changes to stay.
There are three columns in this table:
- Conditions – These are the criteria the customer’s order must meet to qualify for the cost. You may setup multiple conditions here based on price, quantity, dimensions, weight, shipping class, products, categories, and dates.
- Costs – All shippng prices associated with the given conditions are listed. You may setup multiple costs for advanced pricing if desired. You can list prices as a flat rate, percentage of the subtotal, multipled by any of the numerical criteria, or multipled by every ‘x’ number of items, dimensions, weight or price.
- Description – This is optional text that can be seen beneath the shipping title. Every option can have no more than one title, but this allows you to add subtext that changes on a per row basis.
To the right you will find the Additional Settings column containing simple on/off sliders for added funtionality.
- Default Selection – This option is useful when you are giving multiple options to your customers. Your customers will see a list of available options as they ordered on this settings page, with the first option being selected by default. If you would prefer a different option be selected by default, enabling this option will do just that.
- Hide Other Options – Also useful for methods with multiple options, enabling this will hide all other shipping options setup on this page when a shipping rate from this table is returned.
Shipping Class Priorities #
As discussed earlier, there is an option for Per Class setups that allows for only one class’ cost to be returned as the shipping cost for all items in the cart. So instead of combining the cost for each class into one option, only one from one class will be used. There are two ways to determine which cost that is. The Highest Costing option will of course return the highest cost of all the shipping classes. The other option is ‘Highest Priority’.
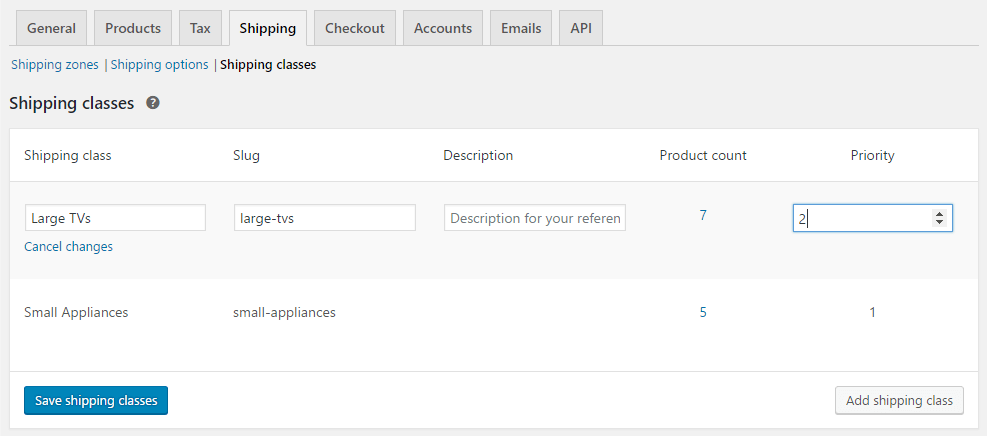
Priorities can be set within the same table that your shipping classes were setup in. After activating this plugin, a new column was added to the end of the list labeled ‘Priority’. By default, all shipping classes will have a priority of 0. To change this, click on the ‘Edit’ link that appears when you hover over a row in the table. This will change the number 0 into a text field where you can set the actual priority value. Click the ‘Save Changes’ button to save the new number. Remember, the higher the number, the higher the priority.


